Learn React JS in This Free 7-Hour Course
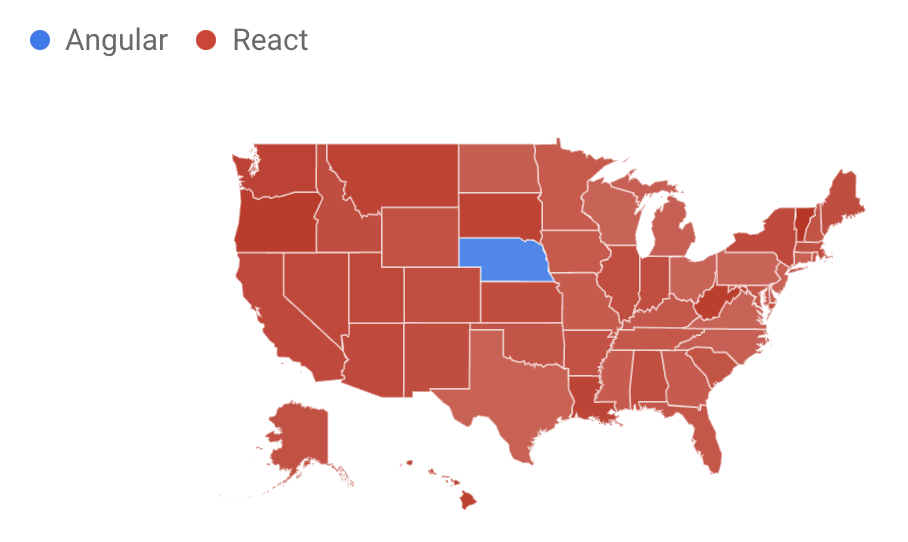
According to Google trends, React is the most popular JavaScript frontend framework. Unless you're in the U.S. state of Nebraska, that is. ????
React is a declarative, efficient, and flexible JavaScript library for building user interfaces. We just released a full React course on the freeCodeCamp.org YouTube channel.
Thomas Weibenfalk created this course. He is an excellent developer and has developed many great courses.
In this course, you will learn React.js from the ground up starting with the fundamentals all the way to more intermediate and advanced topics. You will learn by building a real app.
You will learn:
- React
- JSX
- Styled Components
- React Router
- State and Props
- Context
- CSS
- API handling
- Hooks
- TypeScript
- Persist state in SessionStorage
- Deploy to Netlify
- And much more.
Watch the full course on the freeCodeCamp.org YouTube channel (7-hour watch).
Transcript
(autogenerated)
react is one of the most popular JavaScript frameworks in this comprehensive and well made course.
Thomas Weibenfalk will teach you everything you need to know to start using react.
Hello, and welcome.
I'm Tomas vevo to developer from Sweden.
And thank you for enrolling this course.
I'm actually a little bit of extra proud on this one, because I created a lot of courses during the years now, but this one is the first ever course I created because I love react.
And I wanted to create courses.
So this is the third iteration the third version, meaning that I've improved it a lot and listened to you guys on what stuff you want in the course.
So I think it's actually really good.
There's always room for improvement, of course, but this one, I really enjoyed this one.
And it was fun making it also.
So hopefully, you'll find a lot of basic stuff and intermediate stuff, and maybe some advanced stuff to learn in this course.
And I think we have to get started.
So let's do that.
Let's take a look at the application that we're building in this course.
And it's a nice little move application that is based on the Movie Database API.
So you'll have to create an account at the Movie Database.
But we'll do that in the next video.
So I thought I could show you the application so that you have a little feeling about what we're going to build in this course.
And this one is always going to show the most popular movie here we have this hero image.
So we're going to create this one.
And we also have some text, and we have a header up here also, then we can search for movies, or examples, Star Wars.
And we'll see all the movies here.
So that's how the basic functionality of this application is.
And if we click on the movie, you can see that we get all data from that movie.
So that's nice.
We're going to show the actress and also some information about the movie itself, we can see the revenue, the budget, and the running time, for example.
And here, you may think that you can also click on actors.
And yeah, of course, we could do that.
But I have to limit this tutorial somewhere.
So this course is not going to go there.
But it's a great foundation, if you want to build upon this application.
So you can add in the functionality of showing information about the different actors and stuff like that.
We also have this little breadcrumb menu appears, we can go back to the homepage.
And in this version of the course, this is version three, I'm going to show you how to create the styles also are going to be fairly quick when I show the stars because I still want to have the main focus on react itself.
So that's something that's new in this version three of this course.
And of course everything is going to be responsive, we're going to create that one also, as you can see here, the grid, for example, with the movies, it changes depending on the viewport size.
So that's nice.
So it's a fully working application.
And to be honest, I'm quite proud of this design, I created the design myself course I'm both a developer and the designer.
So that's why I love doing design stuff also.
And I think it looks pretty neat.
Actually, I've updated it slightly, since two previous versions to look a little bit more modern.
But I think it's mostly Yeah, I changed some colors, for example, on the bottom and stuff like that.
Alright, so that's the application.
In the next video, I'm going to talk about the Movie Database API, and how you can register to get your own free API key that I'm going to use in this course.
Okay, so let's talk about the Movie Database API.
That's the API that we're going to use in this course.
And the Movie Database has a great API for fetching a lot of movies, TV shows and stuff like that, we are going to focus on the movies.
So that's what we're going to do here.
And you can sign up for a free account at the Movie Database.
So just go to the movie db.org.
And click Join TMDB.
And then you can fill out a username and password an email and create an account.
And when you have created an account, you probably get an email where you have to verify yourself before you can log in.
But when you have created your account, make sure that you go back to the movie DB and click on login.
And then you enter your username and password just as a regular site that you log into.
All right, and then you're presented with this dashboard kind of thing.
I think it's a dashboard.
And the only thing you have to do is go up here to your profile and click on this round button up here.
And then you have the settings here so she'll settings.
And then at the left menu here, you can see that you have something that's called API.
So click on API, I guess I probably have to blur this ones out because I don't want to show you my own API key.
This is the one that we using API key version three auth.
So this is the one that we're going to use.
So make sure to save this somewhere for now because we are going to add it to our application in a little while.
So make sure that you have easy access to this one as we're going to paste this in into our application in a little while when we have bootstrapped our application with something that's called create react app.
And I'm going to talk more about that in a little while.
Before we start creating our application, I just want to talk a little bit about react and what it is.
So if you go to the React js.org, you can read more about react.
And this is a great starting point, if you just started out with react, they have different documentation, they have tutorials, and a blog and stuff like that.
And you can read everything that you need to know to get started with react.
So I tried to make this course kind of beginner friendly.
But react is kind of at least intermediate in its own nature.
So it's hard to make it really, really beginner friendly.
It also depends a lot on how you learn stuff, I love to learn stuff in this product oriented way, where I just build some product and learn along the way.
So I only create courses on how I want to learn stuff myself, but it's very individual.
So some may think that it's not beginner friendly at all, and so many things that it is.
That's why I also recommend to check out react js.org to read about the very, very basic stuff, at least in react.
So what is react? Yeah, React is a JavaScript library for building user interfaces, as they tell you here, I think, actually that this sentence is a little bit misleading, because you're using react for so much more than to just build a user interface.
For example, I build a lot of stuff, I build small games, I build a Pac Man game, for example.
And I build all the logic in react also.
So it's not only the view layer, so it can be a little bit misleading here, I think.
Just thinking about that you create the components for the view.
But that's not the case, you can use react for so much more if you want to do that.
And in this application, we're building everything in react.
So we have all the API calls and everything it's done from react.
So that's how we're going to use it in this course.
And react uses declarative peridinium.
I don't even know if I pronounced that correctly.
But hopefully, you know what I mean.
So react is declarative.
But for example, jQuery is imperative.
And when something is declarative, you explain, in this case, the user interface, how it will look, you don't have to tell it exactly how you want to achieve that look, you just tell it that we want our UI to look in a certain way.
And then react takes care of the rest.
For example, in jQuery, we have to grab the DOM elements.
And we have to modify the DOM elements.
And we have to create them row by row, and then attach the element to the DOM itself.
So there can be a lot of code involved in doing something simple, actually.
But in react, for example, we have as the Savior, it's component based.
So we create a component, and then we just tell react to use that component.
And it will render out that to the dome for us.
And this will be more clear as we go along in the course and create our own components and create the application itself.
So don't worry if you don't understand everything right now.
So it's declarative, its component base and learn once write anywhere yet as to tell you here, they don't care about the rest of the technology stack.
So that's great, you can use a lot of stuff in combination with react.
So what is a react component? Yeah, we can take a look here, for example, here they create, this is a class and this is kind of, I like to call it the old way, the classes still exist, I don't use them anymore.
And in this course, we're going to focus on creating functional components.
And I'm going to tell you more about that later.
And in the end of the tutorial, when we're finished application, I also going to show you how to convert some of the components, the stateful components to class components, just in case, you need to know how to create class components also, because the reality is, if you start working for a company or a client, there may probably be some components that are still class components.
Because there's a lot of applications made in react that's made before we had state in functional components.
That's why you had to had a class before to have stayed in them.
And we're going to talk about that later also.
So this is a component they created with a class and they call it Hello message.
And as you can see here, they using something that's very much like regular HTML, they have this tag here with a Hello message.
And this name is a so called prop the sending in, and we're going to talk more about props also later, so don't worry about that.
But this is actually not HTML.
It's something that called JSX.
And that's something that we're also going to learn in this course.
So we create the component here, we tell it to use this component and react will take care of the rest and create this div with our text Hello.
And in this case, it's going to be the name that we send in with a prop.
So the name is going to be Taylor.
It's going to type out Hello Taylor.
As you can see here.
So this is very, very neat with react, we can reuse these components in our application.
So that's short on what react is.
And as I told you, we're going to learn a lot more stuff in the course itself when we create application.
And hopefully, at the end of the course, you'll have more understanding of react and how awesome it is.
Because I really love react, I'm really passionate about using react.
And actually, this course is also something that I'm very passionate about.
Because this is my first ever course I created.
And this is the third version, meaning that I have listened to people that have enrolled this course before and changed stuff and added stuff to make it more optimal and more perfect.
And hopefully, you will enjoy this course.
For this course, I provided you with a sip file that you should download before you start the course.
And this zip file contains a few folders here, as you can see, and it may look maybe a little bit different when I am the recording of this course, because I haven't really recorded it yet, but I think it will look this way.
But if it looks a little bit different, it's okay.
Hopefully you can read the folder names and understand what they for.
So I'm going to provide you with a folder that's called files to be copied to the project folder.
These are files that we're going to use for the course.
So I have created a file for us the setups API, so we don't have to write our own functions for fetching the data.
So I'm going to show you that when we fetch data from the API, I have a config file and a helpers file.
And I'm going to talk more about those later also.
And then I have a few images that we also need for the course.
So that's why I have this folder that we're going to copy over to a project when we have created it, and the public folder, the index dot HTML file, I have this here, because I'm using a Google Font for this one.
So I've already provided that one in the index dot HTML, so we don't have to do that ourselves.
So that's the one that we have to copy later.
And I'm going to show you that when the time comes.
And you're also going to have two options.
If you don't want to create everything from scratch, when I set up the application, you can just ignore that and start from a project without the styles.
And this is if you want to create the styles also, I structured this course.
So you should be able to fairly easily just skip the parts where I create the styling for the components.
Some people have, you don't want to create the CSS and the styling.
So that's why I made it in this way.
So this is the one you should use if you want to create the styles.
Otherwise, you use the one that's called with styles, that one will provide you with all the styling, so you don't have to type in the styles.
And you can skip those videos.
So if you want to start from one of those projects, you navigate inside of that one, and in your terminal, you type npm install, and that's going to install all the dependencies for you.
And then every time you start up the application, you can type in NPM start.
And that's also something that I'm going to show you, so don't worry about that.
Then you have a folder with the finished app if you want to check out the result.
But please be aware here, you have to put your own API key in a file that's hidden here now is called dot end.
inside of that one, you have to paste in your own API key, otherwise, it won't work.
And that goes for the step solutions.
Also, I have provided you with step solutions that corresponds to each video.
And if you want to run an example, from a particular step solution, you also have to paste in your API key in the dot m file.
And I also got to talk more about the dot m file.
But this is the start of files.
So you have to think about if you want to create the styling in this course, and you also have to think about now if you want to set everything up from scratch.
Or if you don't want to do that, you can just start from one of these folders here, navigate inside Odin type npm install, or if you're using yarn, you should be able to use that one also.
And then NPM start or yarn start to start up the application.
Alright, let's move on in the next video.
I'm just shortly going to talk about the tooling that I'm using for this course.
Just a short, short little video about what tooling I'm using for this course, I think you already should know this tooling and have it installed to be able to fully take advantage of this course.
Otherwise, it can be a little bit hard.
if you for example, haven't used NPM that I'm going to use to install dependencies.
I suggest that you learn about that first, because this is a beginner slash intermediate course in react.
It's not a beginner course in coding, you should know some JavaScript and especially iOS six syntax, we're going to use a lot of iOS six syntax in this course.
So it should be a good idea to shape up your knowledge in JavaScript before starting to learn.
react.
But that's only my opinion.
But of course, you should do it your own way.
If you want to learn react before vanilla JavaScript, it's totally up to you, I shouldn't tell anyone on how they want to take on their coding journey.
All right, so I'm using NPM.
And that means that I have to have node installed, we're not using no de s, per se.
But no, Deus includes the NPM package manager.
So that's why we have to install that one.
So if you don't have that installed, make sure to grab the latest version and install it.
Then I use Visual Studio code as my ID.
So that's what I'm using in this course.
And then I'm going to use create react app and bootstrap our react application really fast and easy.
So that's what we're going to do.
And I'm actually going to do that in the next video.
So let's get started with our application.
I'm happy to see that you're going to create this project from scratch.
And we're going to use create react app to bootstrap our application.
So let's get started.
If we look at the homepage for create react app, you can find it at create dash react dash app dot Dev.
And then they have something here in the menu that's called get started.
And the only thing that we have to do is remember this row here mpex, create dash react dash app.
And then you have the name of your application that you want to create an empty x is something that's provided with NPM in the latest versions, so you don't have to globally install create react app to use it, this will make sure that we grab the latest version.
So I always use mpex, instead of first globally installing create react app.
So this is really great, because then I know that I'm using the latest version, and you don't have to install it globally.
But if you want to do that, you can of course install create react app globally first, but this is the command that I'm going to use.
So make sure that you navigate inside of your terminal.
I'm using a terminal that's called hyper, I get a lot of questions about that what terminal I'm using, I actually don't remember the name of the theme, but I style it a little bit to my likings.
So that's sweet.
So hyper is a great terminal.
If you want to have a customized terminal.
You also have a built in Terminal in Visual Studio code, of course.
So let's get started, make sure that you navigate inside of a folder where you want to create the reputation.
And then we type in MP x and then create dash, React dash app.
And then we have the name of our application.
And I'm going to name it react dash or dB.
And RM DB stands for react Movie Database.
So that's the best I could come up with.
You can use whatever name you want.
And then we can hit Enter, and then wait for it.
It will install everything for us.
So it will take a little while.
All right.
Hopefully that installed correctly for you.
And create react app has now hopefully bootstrap or application, you could set up this yourself and not use create react app.
But create react app is actually used in in many production applications.
And it's actually used right now for a client that I work with.
And it's a fairly large application.
So you can do a lot of stuff with create react app.
And it's using Babel and Webpack in the background to set up direct environment for you.
So that's what you can do yourself if you don't want to use crate react app.
But I'm not going to show that in this course, because I think it's a little bit advanced for a beginner course.
And actually, we're going to be fine with create react app, that's all that we need.
So we also want to make sure that it works.
So make sure that you navigate inside of the product folder, I'm going to clear this and then type in a CD, React dash or MDB, or whatever you named it.
And then we're inside of that folder.
And then we can type NPM start.
And it should start up our environment.
This is the finished one that's here now.
So it's going to be replaced by this application here.
So it's working.
And we have successfully bootstrap our application.
And that's sweet.
In the next video, we're going to install a few dependencies that we're going to use for this project.
We are bootstrap the application.
And now we're going to install some dependencies that we're going to use for this project.
And the first one is going to be something that's called react router.
And react router is the standard in react application for handling routes, because this is a single page application.
And we need something to handle or rolling because we are going to have different pages.
And the one that we're going to use is called react router.
There is another library that's called reach router.
And I'm actually using that one in version two of this course.
But the team that created reach router and react router is the same team.
So they're going to kind of merge them together into react router, version six.
And this one is still in beta mode, but I've talked to them and I think that I should have this one in this course, because it will soon be out.
And the API won't likely change because we're not going to use the most advanced stuff in this router library.
So we will be fine.
And we have some instructions down here.
I'm at github.com, forward slash react training forward slash react dash router, forward slash releases.
And down below here, we can see that we have some instructions on how to install it.
So I'm going to bring up my terminal, do something like this.
And we could of course, just copy this one and paste it in.
But in my courses, I wanted to learn as much as possible.
And it's always a great idea to not copy paste too much and type stuff in because that will make you remember stuff much easier.
So that's what we're going to do now.
So I'm going to type in MPM II, or if you're using yarn, you can, of course use that instead, I'm going to use NPM for this whole course.
And I'm typing in I instead of typing out the complete word install, that's a short term for install.
So NPM I, and then we need to install something that's called history.
Also, that's another library that's used in combination with react router, and we can install them in one go.
If I type history here, then I have a blank space.
And then I can type in the other library that I want install.
And in this case, it's going to be react dash, router, dash dome.
And then we have an add sign.
And next, and this will grab the better version of react router.
So press enter, and wait for it.
Hopefully, that installed for you correctly.
So I'm going to clear my console again.
And we're going to move on to something that's called styled components, styled components is a super great library to use in combination with react with styled components, we can create our CSS in isolated and scoped components.
So that's really, really great.
And we have a lot of features that we have, for example, in SAS, we can do nesting and stuff like that.
And we can send him props and change our styling dynamically.
And we're going to talk more about styled components as we go along in this course, because we are going to create the styling.
If you choose that path there, I really think you should if you want to have some CSS practice, but it's up to you, I provided you with different alternatives for this course.
So we're going to install style components.
And you can read more about it at style dash components.com.
So go back to the terminal, and we type in MPM is styled dash components.
And we press enter.
Alright, that went smoothly.
So clear the console yet again, and we move on to the last dependency that we need.
And that is something that's called prop types.
Prop types is a great tool in react, where you can type check your props that you send into your components.
So as they say, here is runtime type checking for react props and similar objects.
So that's great.
Today, a lot of people use TypeScript instead, then you don't need to use prop types.
And I actually use TypeScript a lot myself, I'm starting to like it actually.
But in our case, we're not using TypeScript.
Right.
Now, I'm going to show you that at the end of this course in a special module that I created, where we refactor everything to use TypeScript instead.
But for now, we're not using TypeScript.
So that's why we're going to use prop types.
And I'm going to talk more about this later in the course.
And I've placed it title at the end of the course, because I don't want too much stuff going on when we learn react.
So that's why, so I'm going to talk about it at the end of the course.
And when you create a component that has some props, you should use prop types to do type checking on your props.
But I'm not going to do that first, I'm going to add it in later in the course.
So we don't get distracted or have too much stuff going on.
All right, to go back to the terminal, type in NPM.
I dropped dash types, and press enter.
So that's it.
That's our dependencies.
And of course, I didn't mention it at the start of this video, you should of course be in the folder that we created the application that we bootstrapped with create react app, it's very important, you have to navigate inside of that folder.
Otherwise, it won't work because we're installing the dependencies in that project folder.
Alright, in the next video, we're going to copy some files from the store to file c file to this project that we're going to need to make this work.
If we look inside of our project folder, React dash orientdb, we can see that we have some different folders and files here.
And for example, if we look in the public folder, we can see that we have some image files and the index dot HTML file.
And this is the folder that the dev environment is going to build for us.
So the public folder is the finished files that we're using for running the application.
So that's everything inside of there.
And the source folder.
The src folder is going to be the folder where we create all our stuff for application.
So you can see we have some CSS file, we have an app file, an index file and an index CSS file.
We also have a test file.
We're not going to do any tests in this course.
So this one, we're not going to use.
And we have a service worker, we're not going to use this one either.
And we have the set of tests that we're not going to use.
If we take a look inside of a zip file, the starter files that you should have downloaded for this course.
And we take a look inside of the first folder here, one files to be copied to product folder.
Alright, so that's the files that gonna be copied to the project.
So make sure that you mark them here, copy them, move back to your folder, your project folder, and paste them in.
And then you're going to choose to replace the old folders.
This one is in Swedish here.
So you probably don't understand it if you're not from Sweden.
But what it says here is to replace it, so I'm going to click that button.
And then it's going to ask me if I want to merge the source folder or if I want to replace it.
So if it asks you to merge it or replace it, always choose replace.
All right, so we successfully copied the files.
And if we take a look inside of the public folder, here, we're going to have exactly the same files.
The only difference is that I've added in a Google import of a font that's called Abel or Apple, I don't really know, if I pronounce it correctly, it sounds better to pronounce it, Abel.
So I think that's the correct one.
That's the only thing I've changed here.
And that's the in the index dot HTML file, the other files remain the same.
So that's the public folder.
And if we look inside of the src folder, you can see that it's lesser files now.
And that's because I removed all the files that has something to do with tests, or the service worker and all the CSS files that we don't need, because we're going to use styled components.
And I also added in some files and a folder, we have the images folder.
And this one, of course contains the images that we're going to use for this course.
And then I have a file that called API dot j s.
And inside of this file, there are some functions that are going to handle the API calls to the Movie Database API.
And in the previous versions, we actually created this ones ourselves in the course.
But I think that was just a distraction from react and react syntax.
Because this is a course about learning react.
And the thing is that this is regular JavaScript inside of this one, it has nothing to do with react per se.
So that's why I created this one for you instead, and placed them in a file.
And of course, I'm going to talk more about these functions when we reach that point in the course.
And then I have a config file.
And this config file contains everything that has to be set up with a Movie Database API.
And I have a helpers file also, and help us file contains a couple of functions that will help us to convert some numbers into money, and also to convert our time.
And I'm gonna talk more about these two files also, later in this course.
So these are the files, hopefully this one will work.
So if we go back to our terminal, and this one is running now, so just to be sure, I'm going to break it and run NPM start just to see that it works.
It's always a great idea to see that stuff works when you're sharing something.
And then I go to my browser and reload the page.
And you can see I'm at localhost 3000, just as before.
But now this nice little rotating react logo is removed, and it says start here.
And that is because I removed that one.
And I've modified this file so that we can start from here now in this application.
So if it says start here, you know that you successfully copied all the files, hopefully, and it should work for you.
In the next video, we're going to move on and actually use that API key that you got when you registered for the Movie Database API.
Okay, we got one more thing to do.
And then we finished with the setup of our project.
And that is that we're going to create a dot m file and paste in our API key.
So in our application folder at the root, we're going to create a new file, I'm going to call it dot E and V dot m, and create react app has built in support for environmental variables, the only thing that you have to do is to name them with react first.
So react, underscore, and that's important, otherwise, it won't recognize it.
And this one is going to be called AP underscore API underscore key, all capital letters.
And then we have an equal sign.
And then you can paste in your API key here.
And that's everything you have to do.
So just paste it in just after the equal sign, and you're good to go.
And save the file.
This API key is then used in the source folder in my config.js file.
You can see that our get it to here, process dot n dot react app API key.
And this is all managed inside of the Create react app.
When it starts up or dev environment and creates all the files for us and stuff.
It will take care of these various really important to market with react underscore before the actual name of the environmental variable and all this Here is something that I created for you.
So you don't have to care about this.
So I create the different resources from the endpoint on the Movie Database here.
And we're going to use these resources in the course later.
And then I'm going to talk about more.
So I have different endpoints for the search, for example, and to get the popular movies.
And this was our for the bonus videos at the end, where I create the login, and voting that also provided with the Movie Database API, you can log in with your account, and cast a vote on a movie, or on old movies.
If you want to do that.
Then we have the image base URL.
This one is also from the movie database.
So these ones are provided from the API.
So just use them according to their instructions.
And we have a backdrop size, we can set the size of the backdrop and the poster size on the images, we can set different sizes here and I mark them here for you if you want to try to change them and see what it does.
So we don't have to think more about these as I set them up for you.
And there's also a file, it's called API dot j s.
And inside of this one, I created the actual code that is going to fetch the data, we can call these functions later when we fetch the data.
And we don't have to type in all of this ourselves.
And of course, I'm also going to talk more about these functions later when we fetch the movies.
So this one is for fetching all the movies, and this one is for fetching one movie.
And then we have this one here that will fetch the credits.
And below here, these are all for the bonus material also.
So you don't have to care about those in the kind of main part of the course.
So we have three functions here that is going to fetch data for us.
So that's one thing I changed actually, in this version of the course before this, we created these ones ourselves in the course, but I think it's a little bit advanced for a beginner course.
And I also think that it takes the focus on react itself, because this is JavaScript, it's not react specific code.
So that's why and I want this experience, I want this course to be a fun course also.
So you don't get tired and stop the course and won't finish it.
So that's why I created these ones for us.
Alright, so that's the config and a py file.
And then I have one more file that's called helpers dot j s.
And this one contains two functions, that's going to help us to calculate the time and also convert to money, because the numbers that we get from the API has to be converted both the time and the money.
So I'm going to use these ones later in the course also.
Alright, so create the dot m file, create a variable, React underscore app, underscore API underscore key capital letters equals and then you paste in your API key.
Otherwise, it won't work because you can't access the API.
one really important thing to notice here is that this environmental variable won't be safe, because it will be visible in the client.
So don't think that this one won't show up in the browser, of course, you have to look for it.
But if you're good at looking through code, you will be able to find this API key.
So this is not a safe way to provide an API key if you want to hide it from the browser.
In our case, it's not that kind of a secret key, that doesn't matter.
And for the sake of the course, it would be too advanced to create a system that will hide this for us completely.
So notice, this one won't be safe in the client.
Before we move on, I want to talk about a really important aspect of react that I think a lot of people actually forget.
And that is when we create stuff with react, we are also using something that's called JSX.
And it stands for JavaScript, XML.
And if we look here, I'm at the React js.org page now, and they show us here how to create the component.
And this is a class component.
And as I told you, before, we are going to create functional components.
So we're not going to create class components for this application.
But they are using JSX.
Here, and this is JSX.
You may think that this is HTML, but it's actually not it's JSX.
And JSX is something that is really great to use in combination with react, because we can render out our different components like this by using HTML ish syntax.
I think a lot of people actually forget it.
Because I don't know exactly the percentage, but I think at least 99% of the applications use JSX.
In combination with react, some people don't use it.
And that's what I'm going to talk about here.
Because you can create components without JSX in react.
And that is if we scroll down here, you use something that's called create element on the React objects react dot create element, we specify if we want some props.
And then we specify the Child Elements for this element.
And you can see up here, React dot create element, we have the component that we want to create, we have the props, and also we have the children and this is the spread syntax in JavaScript, he has six.
That's why they use three dots here to explain this though.
This one Here is actually the same as this, this one here, will transpile down to react dot create element.
But it wouldn't be practical to use react dot create element for every component and everything you do in react, you can see that it's not that readable, and it will get kind of messy.
And I actually think that react wouldn't be that fun to use if you use it this way.
So I'm just going to show you how to create an element with react dot create element also.
And in the next video, I'm going to talk more about JSX.
But now I'm going to show you just a small example on how you can create an element with react dot create element.
So let's move back to our terminal and make sure that our dev environment is running.
So NPM start, always use NPM.
Start, when you start up your dev server, you can see that we have it running here now.
Then I go back to Visual Studio code.
And I'm going to be in the app.js file.
For this one, it's inside the src folder.
And this is kind of the heart of our application, we have the index.js.
That is the start file for the application.
And you can see the there are import the app component here, these imports are e6 syntax for import.
So we can import a model.
And in this case, the model is a component.
And it's called app.
So I import that one here.
And then it's used here and this one is JSX.
So this is the heart of our application, we have both a library that's called react.
And we have react Dom because react can be used for other stuff than the DOM, for example, you can create native apps with react.
But we are going to use the library react DOM.
And this one is all set up with create react app for us.
So you can see that from the React Dom that we import here, we call the render method.
And we give it the component that we want to render.
And we'll tell it where we want to render it.
So from the document dot get element by ID, we get the root element.
So if we look inside a republic and the index dot HTML, you can see that we have a div here, that's called root.
And it's inside of this div, that we're going to render out our complete application within close to public folder node, and go back to the index.js file.
So we're telling react to render our application to a div that's called route.
And it's also in something that's called react strict mode.
It wasn't that before.
But this is a default.
Now with great drag that in strict mode is actually great.
It's going to do a few more checks if you do some stuff that it shouldn't be doing when you code your application.
So it's always a good idea to using the strict mode in react.
Alright, so let's move back to the app.js file.
And as you can see, here, we have this element here, we have the div that's called AP.
And I render out start here.
And that's the one that we saw before, when we started up the application.
You don't have to type this in if you don't want, because I want to show you this, this has nothing to do with application that we're going to build.
So I'm going to create a little component now.
And then I'm going to remove it and we can continue on creating our application.
I'm going to do it with an arrow function, I like to use arrow function, they don't do it here.
But you can change this one if you want to an arrow function const app equals, and then we create an arrow here instead, like that, I'm used to using arrow functions.
So I use them for components also.
So const, I'm going to create a component that's called store, and I have an arrow function.
And then from react, we import react here, you always have to import react at the top, and another call create element, I have a parenthesis, I'm going to create a div.
And then we're not going to have any props because we haven't talked about props yet.
So I set that one to now, and then I'm going to render out the screen.
This is a little store like that, and I'm going to remove the sidebar, we can see the component here.
So this is instead of using JSX.
And if we want to render this one out, instead of returning this one here, I'm going to return the store.
And as this is the function now, I also have to call it like this, save it.
And then I'm going to go back to the application.
And you can see this is a little star, so it renders out perfectly.
And this is just a small example.
And I want to just for you to notice that you don't need to use JSX.
And this is actually the React functionality at its core.
So you don't have to use JSX.
But we are going to use JSX because it's sweet, and it's fun to work with.
And I think actually that it would be a small l creating applications without JSX at least I think so.
So, I remove everything I created here and save the file.
Again, just make sure that it works stored here.
And it works and that's great.
So that's a little bit about react dot create element and using react Without JSX, just a small, small note on that one, I'm not going to go any deeper into it, because I don't think it's actually relevant to use react without JSX.
So that's why.
Okay, I talked a little about using react without JSX.
But I actually don't think that's a great idea.
So that's why I also want to talk a little about JSX before we move on with this application.
So JSX stands for JavaScript, XML, and it's pretty similar to regular HTML.
So if we take a look here, you can see that they create an h1 tag here that says hello word.
And this looks just like plain HTML.
But as they say, here, this fun attack syntax is neither a string nor HTML, I actually don't think it's a fun attack as to say here, but alright, you get the ID, why JSX.
We can read here more about why we are using JSX.
And the main thing here thing is that they don't want to put markup in one file and logic in another file, they want to have them combined in one file.
And that may sound scary for some, because a couple of years ago, you shouldn't ever mix them together.
But in react, it works really great.
And as they say, here, rack components contain both markup and logic.
So JSX is something that is created to look pretty similar to HTML, there are a few differences.
And I wanted to talk about those here.
Because in this case, we create an h1 element.
And that looks exactly the same.
But there are some stuff that differ from regular HTML.
And for example, you can see you can embed JavaScript as expressions here.
For the source area in the image tag, for example, you can use curly brackets, and then you embed your JavaScript expression.
And that's super great that you can combine them this way.
And also, as you look at tab index, it's camel cased that differs from HTML.
And they say it here also seems JSX is closer to the JavaScript, then to HTML, react, Dom uses camel case property naming convention instead of HTML attribute names.
So remember that, that you have to use camel case in JSX.
And there are some few differences.
For example, when you set a class on an element, you don't use the class keyword, you use class name, camel cased.
And they also mentioned it here.
And it took a little bit of time for me to get used to this one.
And no, I actually typing class name when I type out regular HTML.
And also, it's good to know that JSX is quite safe, it prevents injection attacks and stuff like that.
So I think you'll learn a lot about JSX.
As we go along in this course, because we are going to use practical examples in this course, not the most important part is to remember that JSX is not HTML.
And it's also used camel casing when you create an attribute.
Before we dive in and create our components with state and props, and all these vital things in react, you can sit down, relax, have a drink, have a beer, have a cup of tea, or whatever you're drinking.
And just listen to me in this video, where I'm going to talk a little about props and state in react, the first thing you can do is to imagine that this is a room seen from above.
And the gray circle here is a lamp that's not turned on.
And the orange one is a lamp that's turned on, each of these lamps has a light switch that is often on.
So if I click this one here, I can turn this light on and the light switch is going to change to on.
And this one I can turn it off.
So both lamps are off, and I turn this one on, and I turn this one on.
And this is made possible because I can use state in react.
So I have two states for the lamps.
I have one state for the first time and one for the second lamp that is a Boolean that is telling if the lamp is on and off.
But if we think about this, we actually have a state of the room also, because we need a state also for the light switch to change from off to on.
Because these are kind of tied together so that you can look at the state in different perspectives.
In this case, I will look at the state from the room perspective.
So I haven't placed the states in the lamps or in the light switches, I have placed the states in the room itself because we have a room stage and for the room is going to be if the lamps and the light switches are on or off.
So we have a state for the room itself.
And this is what I talked about in the for example the React documentation, they tell you that you can lift up the state to a parent component if you want to use that stayed in multiple child components.
Because if we placed the state in the lamp itself, for example, we could only access that state in the lamp unto its child components.
Of course, we could place the light switches as a child to the lamp, but that wouldn't be the most effective way of doing it.
And it would complicate things if you want to reuse your code.
So what I've done here is study is that I had this room here and I placed the components in the room and I'm also going to have the state in the room so we can use that state both for the lamps and the light switches and I'm going to show you how Do this now, and also talk a little bit more about state and props.
So if we take a look inside of the code here, this is the application that I created for you.
You can also open it up from the source files in this course, I provided it there.
So I have the index file, the standard index file that shows the app component, and app component is actually going to be the room.
So I could also name this room because this is actually the room component.
And as you can see here, in the room component, I'm creating two states.
In react when you create a state with hooks, you use something that's called the use state hook.
Before we had hooks, we had to use classes to have state in them.
So you couldn't ever create a functional component that has stayed in them.
But now we have hooks, and that means that we can have stateful functional components.
And that's sweet.
So when we call this use state hook, we can initialize it with an initial value.
So in this case, I'm giving it false, because I want this lamp to be turned off initially.
Then I do something that's called ear six destruction here on destruction of this array that I get back from the use state hook.
So we can name our state here to whatever we want.
In this case, I name it is lamp one on and then we have the Center for the state center is lamp one on.
And there's a few things you should know about state in react.
And the first one is that you should look at the state as immutable, you should never mutate the state, then that means that you always should use the state setter that you get back to set the state in react.
If you're modifying the state directly, for example, try to change this one.
This means that your component won't rerender.
And that's no good.
And it can also cause a lot of trouble in the future for you in the application.
But if you use the setter and change the state and don't mutate the state, your component will rerender and update the DOM.
And this is how stuff works in react, you update the DOM when your components rerender.
And one more thing with functional components is that we can add as many states as we want with the use state hook in the class components, you can only have one state, so you have to turn to create an object with different properties to hold your state.
So this is super sweet, we can divide the states up now depending on how we want to structure the state.
So in this case, I created two states, I have one for the lamp one, and I have one for lamp two.
So they are doing the exact same thing.
The only difference here is when I initialize it, I set this one to true and this will turn lamp two on.
Alright, now I have two functions.
And these ones are going to be called when we click the light switch.
So I have one for the light switch one and one for the light switch two, you could have one function instead.
But I want to make it really, really clear on how stuff works.
So that's why I created two of them.
So we have one function for the switch one and one for the switch two.
And this one will set is lamp one, that's the setter for the state one for the lamp one.
And what I do here is that I provide it with an inline function.
And when you provide the state setter with a function, it will get called with the previous state.
So in this case, I'm going to flip that boolean value.
So when I click the button, the first time this value is going to get be true instead because it's false initially.
And this one for a button two is going to be false because it's true.
All right, these are functions for a light switches.
So if we looked at the JSX, here, what we return to the dome, this one is a room component.
And if I go up here, you can see that this is the style component that we're also going to talk a lot about in this course, I create a style component, that's a div here.
So I set some styling on that one on the room itself, I make it 500 pixels width and 500 pixels in height, then I set a border on it, and the margin zero in order is going to center it on the screen.
So everything is wrapped in this room component, then I have a component, that's the lamp, I'm going to talk about that in a second.
And I also have the light switch.
So we have the state in this app component.
That's the room.
So this is where I kind of gather all the states for this little simple application.
And this way, I can use this state in both the lamp component and the light switch.
Because as you can see here for the lamp component i created something that's called props, props is something that you can create and that will get sent along into your component that you create props is an object.
So you can create as many properties on that object as you want.
In this case, I created a lamp on Prop.
So this one will be sent into the lamp component in the prop object.
I also created a prop that's called position.
And this is how I can make the lamp appear on the left or on the right in the room.
And lamp on is going to be the state for the lamps.
So this one is going to be a Boolean.
And that way this component will know if the lamp is on and off.
And I'm going to show you that in a second.
And I do the same with a light switch.
And for this one I have the callback as I showed up here.
I give this one a prop that I call callback.
It doesn't have to be Call callback, that's the name that I chose.
And the switch on, I'm going to give it a lamp state for this one.
So you can see that I use the lamp states for both the lamp and the light switches.
And this is what I talked about before, if we created the state for the lamp in the lamp itself, we wouldn't be able to access this state for the light switch, then we have to create the light switch as a child of the lamp.
And that's no good, as you probably can see now, because now we can place as many lamps and light switches we want in our room.
So it would be much harder to do it if we place the stain in the lamp itself.
And I also have a position prop for the light switch.
So let's go inside of the lamp component that I created here.
I also have a wrapper div for this one that's a styled component.
So I wrap everything in that div.
And the interesting thing with style components is that they also can have props because they are also valid react components.
So we can use props in our style components to modify our CSS.
And that's one of the super strengths with style components, I think, because as you can see here, this is this is something that's called a template literal.
And in this template literal, we can grab the props that are sent into this component.
So in this case, I create dollar sign and curly brackets, and I can use a JavaScript expression.
And I have this inline function here that gets the props.
So if we look at the wrapper component down here, you can see that I also send in a prop lamp on and the position.
So I'm just sending along these props that are initially sent into the lamp component.
So I get them in the lab component, and then I also send them along to the wrapper component.
That's the style component.
And by doing this, I can, for example, check here, if the props dot position equals to the left, then I'm going to set the left value to 20 pixels.
Otherwise, I set it to three or underneath two pixels, and that will place it to the right in the room.
So this way, I can modify my CSS and make it very, very dynamic.
So that's really sweet that you also can use props in the style components.
Alright, that's how style component and props works.
Read more in the original article...
@Credits: FreeCodeCamp
